Showing posts with label China Glaze. Show all posts

Tuesday, 7 February 2017

Crayon Nails and Matte Topcoat Dilemma

Dear Nail Diary,

Hello 2017!  Sorry I didn't see you in January, but I literally slept through most of it.  I tend to hibernate in Winter.  First thing you'll notice is my nails are shorter and squarer.  After a couple of breakage incidents coupled with my sheer frustration with my nails at the length they grew to last year, I've decided to try and keep them at a sensible length.  My right thumbnail has only just come out of recovery and has shown me that I do prefer the tip to extend my fingertips slightly, but not so much that I end up typing with my nails.  I'll still play around with shapes - I'm curious if I could achieve a shorter coffin/ballet nail, as I love the shape but not the length they usually are.  I'm currently rocking a rounded square for my latest nail art.

I came across this post on Pinterest which said it was a "Back to School nail art for kids," which annoyed me because I hate being told when I can or can't do something. 😠
Also I doubt many schools would allow students to have their nails painted like this in school.
I decided to give it a try, even though I'm not good at freehanding.  I pretty pleased with the results for my first time trying something like this.  The hardest challenges were picking out the colours and drawing the little squiggles.


 As you can see from the second photo, even though it's a relatively simple design, I had to use a whole lot of polishes.  In the photo I was inspired by, it looked as though they just finished with a plain glossy topcoat, but I wanted to make them more realistic by making the "paper" part matte.  At a glance they look a little too realistic, as I've been freaking out every time I catch a glimpse of them.


 I've been having a bit of a dilemma over matte topcoats lately.  I've been trying make sure all my recent cosmetic purchases have not been made my companies that test on animals.  So as my OPI matte topcoat was waning thin, I went on the hunt for a new one.  I wanted one just as good, but that also adhered to my changing moral standards.After researching as thoroughly as I could, I decided upon Zoya's "Matte Velvet Topcoat".  After using it several times, I can honestly say for the price, I'm rather disappointed.
As you can see in the photos, although there is a clear distinction between what's matte and glossy, the matte still has some shine to it.  While the effect actually worked well for this nail art, I'm looking for the "chalky" matte that OPI's creates rather than the waxy matte this creates.  I've been repeatedly told that Essie's "Matte About You" is brilliant, however that would mean compromising my No Animal Testing stance.  Next on my list to try is Picture Polish - G'Day Matte, but as they're an indie brand, getting hold of it might be problematic.

Anyway, enough ranting for today, I look forward to showing you more nail art soon.

=:x

Tuesday, 20 December 2016

Snowy Nails

Dear Nail Diary,

This was supposed to be a Mani Monday but I'm a bit behind.  To make up I'll give you a double feature!


I'll start with my Mom's as I did hers first.  It's based on the design of the Glossybox I received last December.  To recreate it I started off with two coats of Collection 2000 - Buried Treasure over a base coat, as it was the closest shade I owned to the box which is a sort of warm/rose gold colour.


I then sponged China Glaze - White on White onto the tips of her index, middle and little fingers.  On those same fingers I haphazardly dabbed China Glaze - Chillin' With My Snowmies in a kind of snowfall gradient.  I still had to place some of them to keep the biggest glitters away from the bottom of the nail.


On her thumb and ring fingers I simply sponged Nails Inc - Champagne Graffiti to the desired amount, as I still wanted a tiny bit of the rose gold to come through.


My nail design has been influenced by several nail art designs I've been looking at on Pinterest - where you can also find me.
I started with two coats of Ciatè - Morning Dew and added a coat of Seche Vite.  Once it was fully dry I added snowflake vinyls, which are part of Twinkled T's Holiday Vinyl Bundle.  I however got them as part of their Limited Edition Holiday Bundle.  Anyway, I painted over the vinyls with China Glaze - I'd Melt For You and a little of Ciatè - Looking Glass.  I then added a matte topcoat to let the iridescence of the Morning Dew "shine" through in a different way.


For my ring finger, I painted two coats of China Glaze - White on White and then a coat of Butter London - Frilly Knickers and finally a matte top coat.  Once that was fully dry I sponged on Barry M - Silver around the tip and up the side of my nail and then poured on some fine silver glitter and brushed off the excess. On top of this I also dabbed light glitter coats of Essie - A Cut Above and London Girl - 42 and added a thick coat of Seche Vite, careful not to get any on the matte part of my nail.


Unbelievably I've chipped this already, so hopefully later this week I'll be posting a new mani.

>:x

Monday, 12 December 2016

Mani Monday: Candy Cane Lane

Dear Nail Diary,

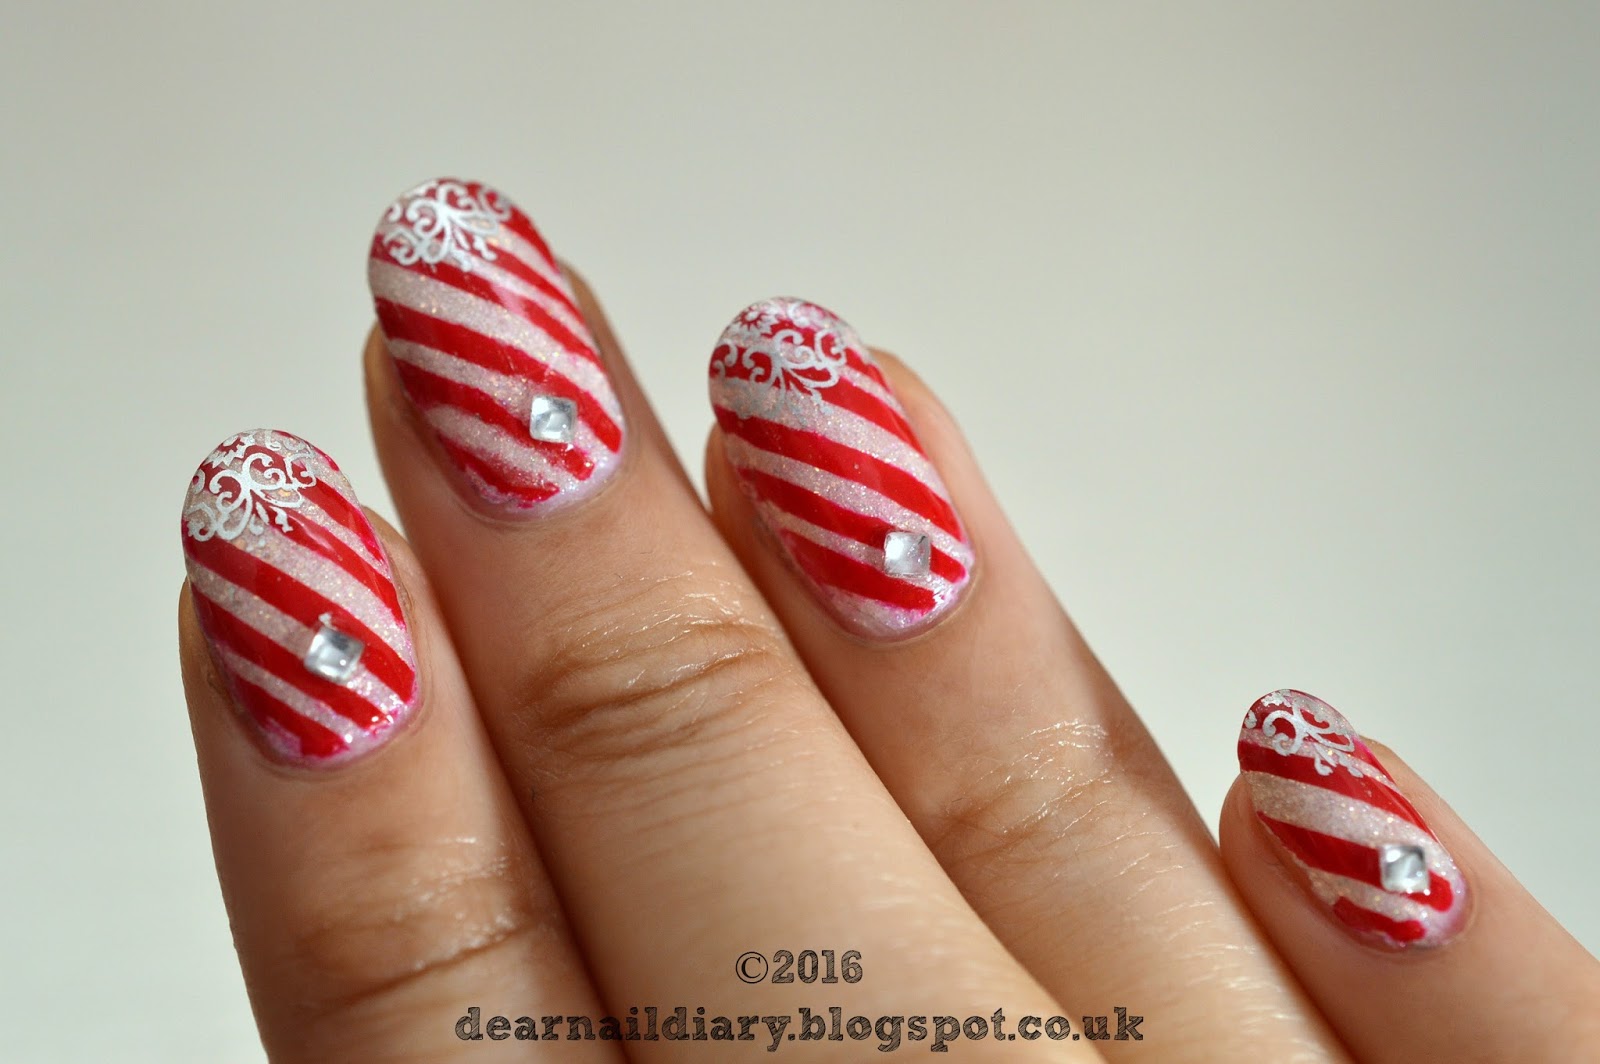
As promised here is the first of my Holoday Nails, before I do my Mom's and potentially ruin them.  Also if you want to get technical there isn't actually any holo in this design, only iridescence and sparklies.  I was desperate to try my new candy cane stripe vinyls - now they are holo! I started off with a base of Barry M - Lady.  It's a textured polish, but a couple coats of SV sorted that out.  I then applied the vinyls and painted on Nails Inc - St James.  I was just going to leave it there but there seemed to be something missing...


More sparkle!  So I glued on some square rhinestones and added another coat of SV.  However it still wasn't enough...


So lastly I stamped a filigree style design on the tips of my nails using China Glaze - I'd Melt For You and added a final couple of coats of SV.  It's been a couple of days and I'm impressed I haven't lost any rhinestones yet as I've usually lost at least one an hour after I've done my nails.


I'll be back when I've done my Mom's nails as I forgot to take a photo of the design I last did for her.

=:x

Sunday, 11 December 2016

George and the Dragon

Dear Nail Diary,

I apologise if the nail art is looking a little worse for wear in these photos, I've been meaning to take pictures for a few days, but I've been too ill to take them.  Yesterday however, one chipped completely off the nail on my other hand so I thought I'd better get a photo while I still can.


I love the two green holo polishes from A England - Saint George and Dragon and I wanted to build a design around them.  I started off with this Dragon Scale Triple Gradient tutorial from Simply Nailogical:-


It was the first time I've tried a scaled gradient and while it ccame out okay, it seemed pretty basic just on it's own, so I decided to add some elements.  Using a dragon vinyl from Twinkled T's Mythical Creatures collection, I painted it using Nails Inc's red/orange duochrome glitter polish - New Burlington Place.  On my next three fingers I stamped a fiery looking tribal stamp with an orangey/gold shimmer polish from Avon that I've had for ages.  I also painted a light coat of China Glaze's Golden Enchantment on top of the flames.  Duochrome dragons breathe golden holo fire, don't you know? ;)


Wouldn't you know my camera died just before I could take this last photo, so I had to take it with my tablet.  My thumb is what my duochrome dragon is protecting - its treasure room.  I did a quick glitter gradient using OPI/Gwen Stefani - Don't Speak and a thin layer of the golden holo on top.


Next time I'll have photos of the first of my Holoday nails!

=:x

Thursday, 8 December 2016

Furry Fail

Dear Nail Diary,

I forgot I hadn't posted this.  I recently bought some nail vinyls from Twinkled T (among other things) and was desperate to try this idea I'd had to honour my cat who died a couple of months ago.  Cristine from Simply Nailogical has these cat cyclone vinyls and I wanted to see how they'd look combined with the flocking powder I got from Bundle Monster.  I imagined a really cool texture effect between the A England polish I'd chosen and the furriness of the powder, however the end result wasn't as impressive.


I think it would have been better if I'd used nail glue or top coat instead of clear polish to adhere the flocking powder.  Also it was obvious right away that I needed a more striking colour of powder if it wasn't going to create the effect I wanted.


I changed to a purple, however that just seemed to emphasize how badly the powder wasn't sticking.  The last time I used the flocking powder it worked really well, but I think that was because I was applying to my entire nail.  I tried a vinyl with a gold holo glitter just to make sure it wasn't my lack of skills with vinyls that was failing me - as you can see, that wasn't the case.


It worked slightly better on my right hand which I did second, so maybe I just need to practice this technique a bit more?

=:x

Friday, 11 November 2016

Back From the Dead

Dear Nail Diary,

Hallelujah, I'm back into nail art again.  I've been in a bit of a slump lately, plus I've been immersed in a jewellery collection I'm currently making/designing and I just haven't been in the mood to have pretty nails.  After skulking around the internet I discovered Simply Nailogical on YouTube and fell in love with her style.  BTW, I am a confirmed Holosexual - check out her videos to find out what that means!  Anyway, I've been so blown away by how far nail art has come in the time I've been away, that I couldn't resist any longer.

So here's what I've been wearing the past week on my nails, while I wait for some new nail art goodies to come from 'Merca...


I'm loving how much more intricate and cool vinyls have become, so before I get the ones I've just ordered from Twinkled T, I made do with some cheap Christmas border stickers I had lying around.  I picked up two random colours from my stash: China Glaze - Define Good and Nails Inc - Lanesborough Place.

I'm really pleased with how it came out, considering being nail vinyls are not these stickers' intended purpose.  The Seche Vite topcoat kind of dragged the design a bit, but other than that it would be a pretty cool look for Christmas I suppose.

=:x

Sunday, 5 April 2015

Happy Easter!

Dear Nail Diary,

I'm sorry I haven't posted in a while, but real-life issues have meant I haven't really been in the mood to do anything with my nails.  I thought I'd ease myself in slowly, as X99 is currently taking up all of my time.  I have a new camera (my first DSLR - a Nikon D3200) so I've been retaking photos of all my jewellery so it looks more professional.  I'm still learning all the features, so I thought I'd test it out on taking photos of my nails first.

Thursday, 1 January 2015

Happy New Year!

Dear Nail Diary,

This is only going to be a quick photo post, which I'll add details to later, but I thought you'd like to see the nails I was rocking last night.

Tuesday, 23 December 2014

Christmas Nails

Merry Christmas!
I thought I'd show you some of the nail designs I've been doing in the run up to Christmas.

 This is the Gift Wrapped design I did for my mom.
I started out with two coats of China Glaze's Tip Your Hat from the Twinkle Collection.  Using gold sticker stripes and a gold bow, I created the gift design on the middle finger.  On the index and ring fingers I added glitter stars.
Recently I did this Christmas design, inspired by various designs I saw over the internet.
On the thumb, index and baby fingers, I painted two coats of Rimmel's Block Your Green.  Then on the middle and ring fingers I painted a two coat base of China Glaze's White On White.
 On the middle fingers I applied striping tape in a diagonal pattern, painted London Girl's 149 on top and carefully removed the tape to create this candy cane effect.
For the ring fingers, I applied tape in an inverted "V" and began dotting various sizes with the London Girl and the Rimmel to make a tree and placed a star sticker on the top before sealing it with a top coat of Seche Vite.

My own mani was inspired by a candle created by my friend Maryann over at One Stop Pamper. I'm not sure if she still makes it, but it smelt like peppermint.  It had these glitter particles in it, so it not only looked, but smelt like fresh snow.
Two coats of China Glaze's White On White and then a coat of Butter London's Frilly Knickers to create the snow effect.  On my thumb and baby fingers I did a glitter gradient with China Glaze's De-Light from the Twinkle Collection.  On the rest, I painted on Nails Inc's Diamond Arcade and sealed it with Seche Vite.

I may do another mani for Christmas Day, if I do, it will probably posted after the day itself.  It I don't, have an awesome December 25th, whatever you may be doing that day!
=:x

Monday, 24 November 2014

Polish Haul

Dear Nail Diary,

Sorry this post is a bit late, but I've been busy updating X99 and making jewellery and Christmas decorations.
Today I've decided to share my latest additions to my polish collection, as jewellery making isn't really conducive to a neat manicure!  I'm currently wearing my chipped polish from last Monday - terrible, I know. :(
Warning: Photo heavy post!

Tuesday, 11 November 2014

China Glaze Twinkle Collection Review - Part 2

Dear Nail Diary,

This is the second part of my review for China Glaze's Twinkle Collection.  Sorry it's a bit late, however there was a mix up with my order and I had to wait for it to be corrected before I could post this.  While I've been waiting, I've updated the look of the blog and I think it fits in better with the image I'm trying to create.
Anyway, on with the Twinkle Collection....

Tuesday, 4 November 2014

China Glaze Twinkle Collection Review - Part 1

Dear Nail Diary,

This is my first time reviewing a collection.  I'm a complete amateur, so I don't know all the technicalities and whatnot, so this will just be my honest opinion of how I thought they looked on me and how smooth the application was.  Also, I can't wait to get my new camera so my photos will come out clearer and the colours more accurate.  My current camera hates purples and greens. :(

Friday, 31 October 2014

Happy Halloween!

Dear Nail Diary,

Happy Halloween!

I love this time of year - and not just because of all the sweet treats!  The weather (which has been unseasonably warm round here), the food and the nails.
First up, Candy Corn nails.  Maybe because I'm not American, but I don't get the hate that these get.  I always make sure I have a bag for Halloween.


Monday, 27 October 2014

Mani Monday - Calling It Curtains

Dear Nail Diary,

Well "it's just another Mani Monday..." and today I have a design I did on my Mom's nails instead of mine - mine are rather busy with jewellery making at the moment.  I've been inspired by my doctors surgery again, or rather my mom was.  I was showing her the floor that inspired me a couple of weeks back, while we were getting our flu jabs (stupid asthma!) and she noticed the privacy curtain and thought the design would make a cool nail art pattern.


Thursday, 25 September 2014

Neon Criss-Cross

Dear Nail Diary,

I haven't been feeling up to doing my nails for a while, but I'm finally getting back.  Not sure where the idea for this came from, it certainly wasn't what I was intending, but I like it nonetheless.


After applying my base coat I painted two coats of Barry M - White.  Once dry, I sponged on some neons (Manic Panic - Electric Banana, Nails Inc - Kensington Park Road & Sloane Street, China Glaze - I'm With The Lifeguard and Essie - Action) in random gradients.  I sealed them with SV and waited for it to dry.  I then applied nail tape in a criss-cross pattern across each nail and painted on a think coat of Barry M - Black over the top.  I immediately removed the tape and allowed it to set a little before I applied a final coat of SV.

It's quite pretty, however I think I'll take the plunge next time and use the neons as a base over the entire nail.

=:x

Friday, 8 August 2014

Sunshine

Dear Nail Diary,

It may be a teensy bit grey outside my window, but at least my nails look sunshiney.  I told you I felt a yellow phase coming on.


Tuesday, 15 July 2014

Gold Shards

Dear Nail Diary,

I'm on a matte kick at the moment, everything just seems to look better.  I think it's because the rest of me is so shiny in this heat, I don't want my nails to be too.  Does that make sense?


I randomly picked up the Rimmel Pearly Queen.  I fell in love with it instantly when I bought it, but I had any inspiration to use it recently.  With the matte coat on it looks gold-like, however it's iridescent and changes colour from a pearly white, to a lilac, to a greeny-gold shimmer.  I applied two coats and one coat of the gorgeous China Glaze Luxe & Lush, from the Hunger Games - Capitol Colours Collection.  It looked good as it was, but as I said I've been on a matte kick, so out came the O.P.I. Matte Top Coat.  The finished look is not something I would have picked out for myself.  I was worried that the iridescent shards in the China Glaze would be overkill with the Rimmel, but it's really quite subtle.

=:x

Friday, 11 July 2014

'Merca Day Mani

Dear Nail Diary,

I don't often do flag inspired nails, mainly because my Mom has been asking me to do them for World Cup games and every time I have they've lost!  I didn't see the harm in doing this homage to Independence Day.


I didn't want to do a traditional Stars 'n' Stripes - mainly because I'm lazy!  So decided stretch it out across my whole hand. On my thumb and index I painted two coats of Barry M - Indigo and then sealed it with a coat of Seche Vite.  Once dry, I stamped Barry M - White with Pueen Plate 44 and there are my stars.
For the rest of my nails I painted two coats of Barry M - White, sealed with SV and stamped the curiously named China Glaze - Aztec Orange with Pueen Plate 32 turned on its side to create the stripes.
I finished with a final coat of SV.

=:x